Paper Quilling Basics: Tools, Shapes & Easy Projects
Rolling Paper Into Art: A Beginner-Friendly Start to Paper Quilling
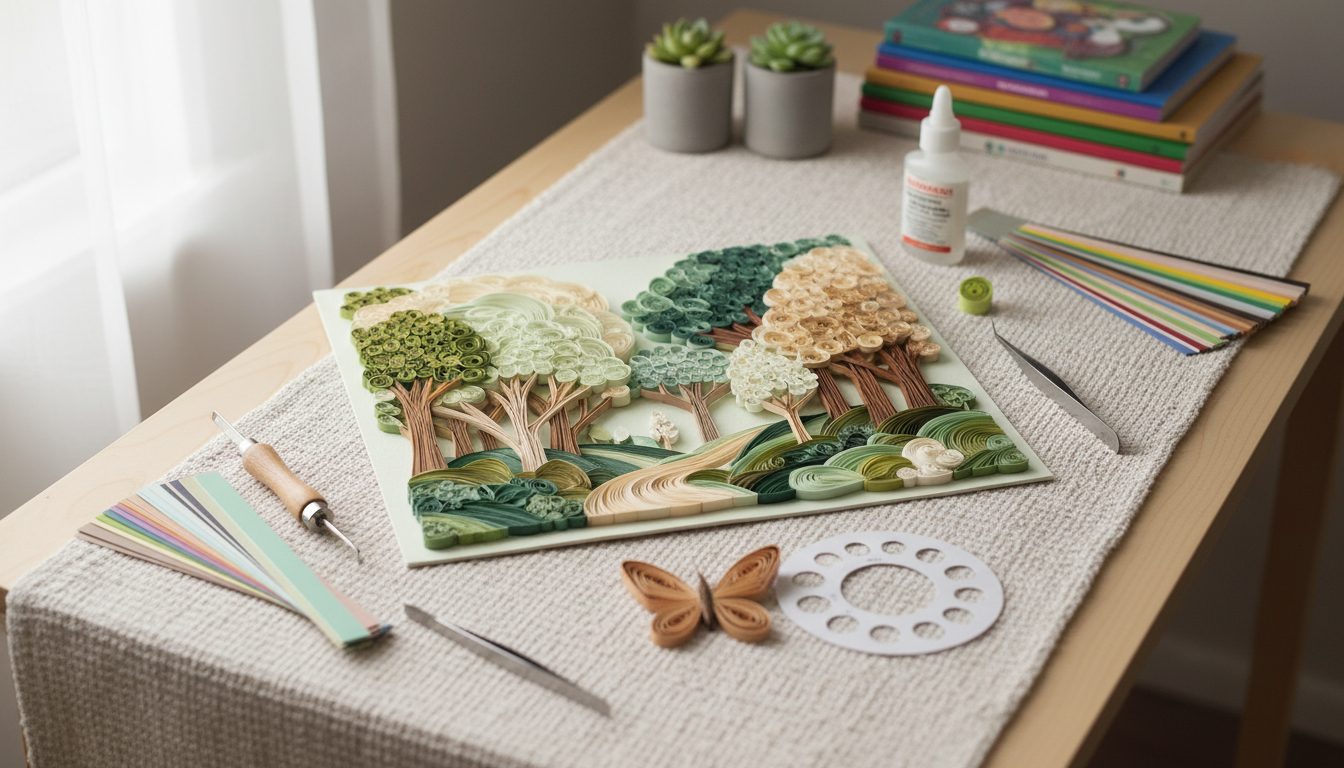
Paper quilling turns simple paper strips into coils, teardrops, and scrolls that can be arranged into cards, wall art, ornaments, and gift toppers. With a few basic tools and a handful of foundational shapes, beginners can create clean, detailed designs quickly while building confidence and control. For more guidance, see [PDF] COLAB PAPER QUILLING | Anchorage Museum.
What Paper Quilling Is (and Why It’s So Beginner-Friendly)
Paper quilling (also called paper filigree) is the craft of rolling narrow paper strips into coils, shaping those coils, and gluing them into decorative designs. It’s approachable because it rewards small improvements: a smoother roll, a more consistent coil size, a cleaner glue dot. For further reading, see Quilling 101 – How to Start Paper Quilling – A Free Tutorial.
- Easy to scale: start with a few coils and grow into layered flowers, mandalas, borders, or lettering.
- Small-space friendly: a tool, glue, tweezers, and a small work surface is plenty.
- Low waste: practice coils can become mini gift tags, tiny card accents, or sampler pages.
- Fast beginner wins: smooth coils, consistent sizing, tidy glue control, and balanced layouts.
If you want a quick overview of the craft’s history and variations, Wikipedia’s quilling entry is a useful starting point, and The Spruce Crafts quilling basics offers practical beginner tips.
Supplies to Get Started (Plus Budget-Friendly Alternatives)
You can start with a minimal kit and upgrade as you learn what styles you enjoy. Many beginners find that fewer options (especially fewer colors) leads to cleaner early projects and less decision fatigue.
- Paper strips: 3 mm (1/8 in) is a common beginner width. Pick a small palette—two main colors plus a neutral looks cohesive.
- Quilling tool: a slotted tool makes it easy to catch the paper end; needle tools can create tighter coils but take more control.
- Glue: PVA craft glue or tacky glue. Use a fine-tip bottle or toothpick so you can apply micro-dots.
- Tweezers + small scissors: tweezers help placement; scissors help trimming and fringed petals.
- Ruler or circle sizer: templates keep repeated shapes uniform.
- Work surface: wax paper or a non-stick sheet for drying; foam board helps when pinning layouts.
| Item | Why it helps | Beginner substitute |
|---|---|---|
| Pre-cut quilling strips | Consistent width for neat coils | Cut printer paper or lightweight cardstock into strips |
| Slotted quilling tool | Easier start and steadier rolls | Toothpick (for larger coils) |
| PVA/tacky glue | Strong bond with minimal shine | School glue (use sparingly; longer dry time) |
| Circle sizer/template | Uniform loose coils and petals | Ruler + DIY circles drawn on cardstock |
| Tweezers | Precise placement without crushing shapes | Clean fingertips + gentle pressure |
| Non-stick drying surface | Prevents pieces from sticking while drying | Wax paper or baking parchment |
Core Techniques That Make Everything Easier
Quilling feels “fiddly” until the basics click. These techniques reduce frustration and instantly improve how finished pieces look.
- Rolling: keep the strip aligned edge-to-edge while turning the tool. Steady, even tension creates smoother coils.
- Releasing: for loose coils, let the coil relax inside a circle sizer before gluing the end so your sizes match.
- Gluing: apply the smallest possible dot to the tail end. Hold for a second, then set aside to dry fully before shaping again.
- Shaping: pinch gently to create points; curve ends for scrolls; avoid squeezing the whole coil.
- Sizing: repeated measurements (strip length + template size) create clean patterns that look intentional.
- Planning: dry-fit your shapes on the background first, then glue once the composition feels balanced.
Five Foundational Shapes to Practice (and Where They’re Used)
- Tight coil: roll firmly and glue immediately. Great for dots, flower centers, and compact details.
- Loose coil: release in a template size before gluing. The base for petals, leaves, and repeating motifs.
- Teardrop: pinch one side of a loose coil. Perfect for petals, feathers, and raindrop accents.
- Marquise (eye): pinch both sides. Useful for leaves, wheat-like stalks, and radiating patterns.
- Scrolls: roll ends inward or outward without gluing. Adds flourishes, vines, and borders.
A helpful way to practice is to make a “swatch page”: glue one of each shape to cardstock and write the strip length and template size next to it. That reference makes repeat projects much easier.
Beginner Projects That Look Impressive Without Complex Skills
Common Beginner Problems (and Quick Fixes)
Finishing, Framing, and Keeping Quilling Art Safe
Using a Digital Quilling Guide to Learn Faster
For guided practice and beginner-friendly projects, see Rolling Paper Into Art – A Beginner-Friendly Guide to Paper Quilling Basics (Digital Download).
If you like keeping your craft time organized, you may also want a planning system that supports consistent practice sessions: The Professional Deep-Clean Planning Bundle: Weekly & Seasonal Guides, Checklists, eBooks. For a simple routine that helps keep hands comfortable when working with paper and glue, Skin Care Made Simple for Real Life (Digital Download) is another option.
FAQ
What paper is best for beginner quilling?
Pre-cut quilling strips in 3 mm (1/8 in) are easy to control and keep your coils consistent. Lightweight cardstock also works well, while regular printer paper is fine for practice. Very thick cardstock is harder to roll smoothly, especially for tight coils.
Do beginners need a quilling tool, or can paper be rolled by hand?
A tool isn’t required, but it makes rolling faster and much more consistent. Hand-rolling can work for larger loose coils, yet it’s tougher to get tight, uniform shapes. A slotted quilling tool is usually the easiest starting point.
How do you stop quilling glue from showing?
Use the tiniest amount possible—apply with a toothpick or fine-tip bottle and wipe any excess right away. Let pieces dry before repositioning so you don’t smear glue. Tacky or PVA glues that dry clear also help reduce shine.


Leave a comment